Aubergine Aubépine

Aubépine1I had been wanting to sew the Aubépine dress in this fabric for a little over a year. I got the fabric at a swap last year and even though I didn’t like its colour, a very pale yellow, I thought it would be perfect for the dress once I had dyed it a beautiful purple.

BeforeAfterI was sure it was either all viscose or a viscose and cotton blend, but judging from the result of the dyeing, it must be a viscose and synthetic blend: the weft came out a perfect purple while the warp stayed the exact same pale yellow as before. Ah well I thought, it’s still a nice colour!

What I didn’t like (and still don’t) is that once dyed, the fabric got sort of a shiny quality. Not only do I not like that per se, but it also has the unwanted effect of emphasising each and every crease. And unfortunately, there are a lot of creases on this dress!

Aubépine2I knew the fabric was prone to distortion, so I had planned on using fusible bias tape to stabilise the neckline and armholes. But I didn’t have any in stock and I didn’t think to staystitch instead, so between the pressing and sewing of the tucks and darts and other manipulations, when I sewed the shell and lining together, the shell bodice had grown bigger than the lining bodice.

So while the lining is a perfect fit, the exterior fabric is kind of a mess. There are creases everywhere on the front bodice even after the most careful pressing. The back bodice is a little better except for a few centimetres at the sleeve seams.

Aubépine3Another bad choice I made was forgetting that the waist seam was going to be enclosed in the waist casing and using French seams there that were not only not needed, but that added bulk in the casing.

All of that is not bad enough that I don’t want to wear the dress, but it does make me a bit self-conscious at times, and then I have to remind myself that people who don’t sew won’t notice there’s anything wrong with my dress.

Aubépine4And the dress is so comfortable that it would be a shame not to wear it! I even replaced the drawstring with a piece of elastic for maximum comfort. For that I didn’t make two buttonholes at the front of the dress but only one buttonhole at the back of the lining, to be able to thread the elastic through the casing.

Aubépine5Except for the replacement of the drawstring with elastic, I followed the instructions to the letter. The step I dreaded most was making the tucks and this was actually a piece of cake. The part I found most tedious was basting the shell and lining waist seams together before sewing the casing: this took way too much time. Other than that, I really enjoyed the process of sewing this dress.

And I love the lining I used: it’s a beautiful silk that was a delight to sew and that is a delight to wear. I wasn’t keen on using the recommended cotton voile as a lining because of static cling with tights (it is a fall dress after all), and this silk is a perfect substitute.

Aubépine6As a matter of fact, the beauty of the lining, the fact that everything is French seamed and my issues with the outside bodice mean that the dress is almost prettier inside than outside!

Dirndl Blouse

Dirndl1The sewjo is back! I loved this dirndl blouse pattern I saw in the last September issue of Burda (magazine), and for once I didn’t forget about it and/or postpone it indefinitely! To tell the truth, the thing that motivated me to start this project and not another one was that I had just gotten this piece of fabric from a swap at Saki’s and it was such a weird shape that I didn’t want to bother trying to fold it neatly. I found it easier to start sewing it immediately! 😀

Dirndl3This was a pretty easy sew if not for the fact that I always have the hardest time understanding written sewing instructions. I’m not even going to try and blame it on Burda, whose language we know can be quite cryptic. This time the instructions were clear… I’m the one who couldn’t make any sense from them!

The thing is, I only understood what they were saying once I already knew what I had to do: so when I read a step in the sewing guide, I didn’t understand it, then once I had figured out what to do on my own, I came back to the instructions and thought: “So that’s what they were trying to tell me!”.

Dirndl4Not that you’d need that much handholding sewing this blouse; there’s nothing really complicated there. The only thing I truly needed the instructions for was the neck opening/facing. I have the worst spatial intelligence, so I had to resort to doing a paper simulation of that one in order to get it! Okay, please do not laugh, three paper simulations…

Dirndl5At least those simulations did help and I got a better result than I would have gotten had I dived right in. I just had to topstitch the neckline edge twice instead of once because there were a couple centimetres of the neckline facing that hadn’t been caught in the first line of stitching. I initially wanted to unpick this first line of stitching after sewing the second one, but I decided the two rows of stitching actually looked cute so both could stay.

Dirndl6Once I had understood them, I mainly followed the instructions. The first of the only two things I did differently was inverting two steps: Burda has you sew the sleeve hem first, then the side seams, but I prefer the finish of sewing the side seams first, then the sleeve hem.

While we’re talking about the side seams, I made the dumbest mistake there! I thought I was being clever by using French seams, but I forgot how curved those seams were: there was no way French seams were going to work! So I had to clip my beautiful French seams afterwards, not the perfect finish I was hoping for! I reinforced the underarm seams before clipping the seam allowances to avoid any unravelling.

The second thing I did differently from the instructions was drafting a facing for the top of the neckline. It was supposed to be left raw, which I didn’t fancy at all. That facing trick worked like a charm. No raw edges on any of my clothing, ever!

Vintage faux pearl button from my mother's stash.

Vintage faux pearl button from my mother’s stash.

I find this blouse really cute, it’s a style I’m very fond of. I love it tucked in high-waisted skirts, dirndl or not! Not that you could tell judging from the awful angle I took these pictures from, ahem!

I feared the weather would soon be too cold to wear such a light blouse, but when I put it on I forgot I was wearing a thermal cami and only realised that after taking the pictures, so I guess I can wear it with a cami under it and a cardigan over it and not have to wait for spring after all!

Dirndl2

The First Fall Dress

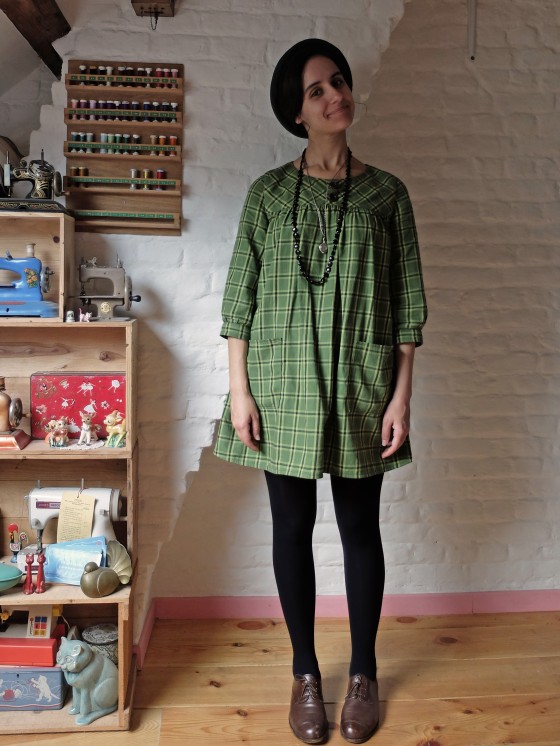
Smock1I bought this fabric and the book the pattern is from during the same trip to Paris, three years ago. I immediately knew I wanted to pair the two together, yet every year I let fall pass me by without taking the time to materialise my project. So this year, when wondering what to sew next after finishing my Centaurée and thinking I’d like to sew something that would be evocative of the beginning of fall, this old idea sprung to mind.

Smock2A few years ago, the Stylish Dress Book series and other Japanese pattern books were very popular on the French speaking blogosphere (about as popular as Deer&Doe nowadays, to give you an idea!). Then they fell out of fashion to the point that a lot of people started frowning upon them, lamenting that the patterns were unflattering and that they made even the thinnest person look fat. Well, I beg to differ!

It’s true that most patterns in these books are all but form-fitting, yet I don’t think they are unflattering at all. Of course, they are not flattering in the sense that they make you look thinner than you are, but does looking good always have to equate with looking your thinnest?

Smock3One of the main real problems of the Japanese pattern books was (is?) that the darts are usually insanely high (the other one being that the sizes are very restricted, stopping at a mere 93 cm/36 ½” bust for the Stylish Dress Book!). But this pattern (SDB3 Dress H) doesn’t have any, so I didn’t have to make any fitting adjustments, phew! So I didn’t make a muslin, thinking the fit of such a loose smock would be forgiving.

This would have been such an easy project had it not been for my fabric choice. I thought I knew what I was getting myself into with the plaid matching, but I had not counted on the shifty nature of the fabric… It’s a cotton flannel; I had no idea those could be that tricky, but I swear it had a life of its own! Plaid + shifty fabric = four-hour-long cutting nightmare. I was so relieved (and so proud!) when I sewed the pieces together and every line that could match, well, did!

Smock4The only thing I’m not entirely happy about is the yoke: I chose to cut it on the bias (thinking yay, no plaid matching there, then oops, still have to match the shoulders and the button bands!) and added a lining that I cut on the straight grain to stop the bias-cut yoke from stretching out of shape. It didn’t work that well: the fabric is so unstable that it still stretched out a little bit, so it doesn’t sit flush on the shoulders. It bothered me at first (WHY can’t ANY project ever be perfect?!), but having worn the dress a few times already, I had forgotten about it until writing this article.

SDB3HI made a few small modifications other than adding a lining to the yoke. As you can (sort of) see above, the dress doesn’t normally have any button bands. I added some length (3 cm/1 ¼”) to the front yoke pieces so that they’d overlap and form the button bands. I had planned on sewing some buttonholes there, but when I tried I quickly realised that with that fabric and the fact that that part was cut on the bias, I’d better settle for snaps. And I have to say I really like the result! I loathe snaps for garments that are worn open, but for this dress, which is going to be worn closed at all times, I find them very convenient.

Smock5Other things I changed in my version are omitting the yoke ruffles and adding patch pockets. When was the last time I sewed a dress and did not add patch pockets? I think this is the third dress in a row that gets the same treatment… I should rename my blog Rue des Patch Pockets or something. So I added patch pockets. And I love them.

The last change I made was not to add any seam allowance at the hem (I wanted a short dress!) and finishing it with black bias tape.

Smock6I took the pictures coming back from work, which is why the dress may seem a bit wrinkled in places. It’s a very comfortable dress to wear, albeit a bit short. If I need to raise my arms (for, say, write at the top of the blackboard), I have to be careful to push up the sleeves past the elbows first, otherwise the whole dress goes up and I risk flashing too much thigh (or worse!). But I’ve worn it at work a few times already, and there have been no problems in that respect.

All in all it’s a very cosy dress, perfect for fall and winter. It took me three years before finally sewing it, but a pattern/fabric match that hasn’t changed in three years could only mean success. And despite the small problem at the shoulders, I’m really proud of the finishing work I did.