Colourful Airelle

airelle1I bought this small piece of Liberty tana lawn (Garden Wonderland) a few months ago with the intention of making a blouse out of it. Then I changed my mind and decided to make a gathered skirt with a back elasticated waistband instead. I made a mess out of said gathered skirt (don’t ask!), and all I was left with were the front and back panels of the skirt, which luckily were juuuust enough for a blouse, so back to square one.

airelle4
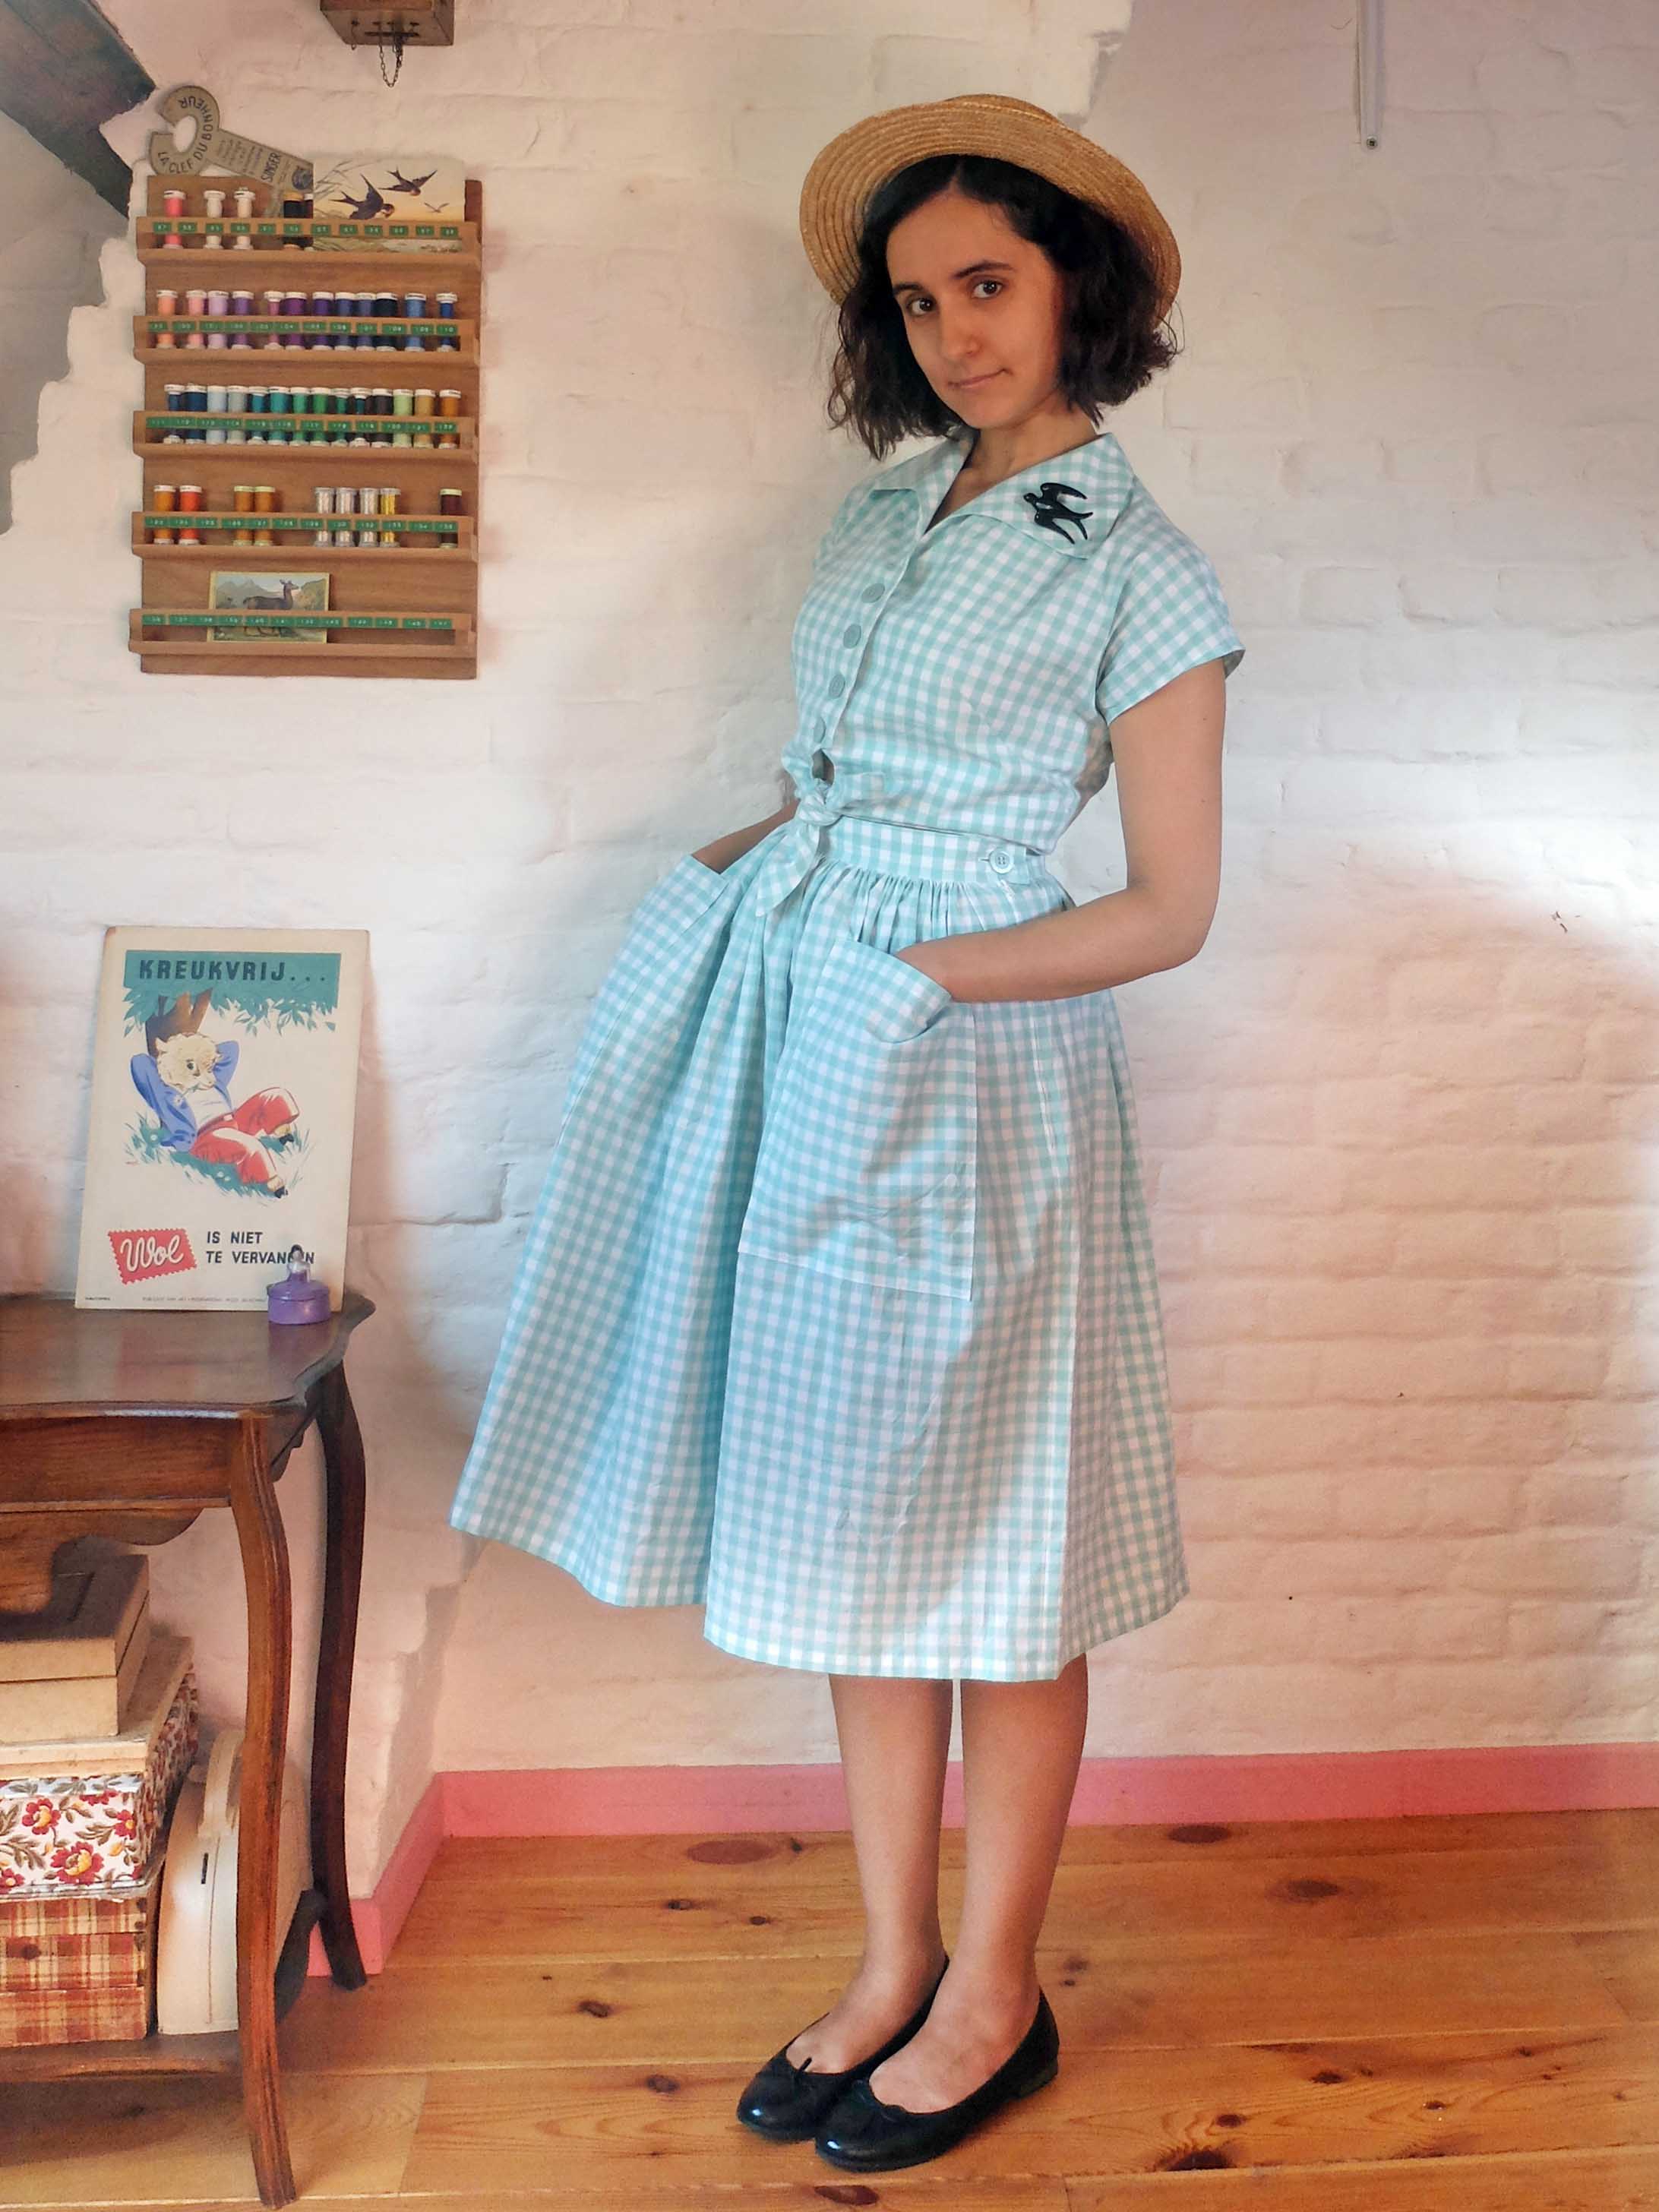
I decided to try the Deer&Doe Airelle blouse (if you clicked through those links: doesn’t one of the models look familiar? 😀 ) with the sleeve caps of the Réglisse dress, because that was all I could squeeze out of my skirt panels. I had to shorten the Réglisse sleeve caps for them to correspond to the armholes of the blouse, but style wise I think they suit the blouse very well.

airelle3I made a straight size 36, which fits pretty well I’d say. Had I cut the normal Airelle sleeves, I would have graded the shoulders up to a 38, but the sleeve caps allowed me to forgo that step.

airelle6It was a straightforward sew that didn’t take me more than two days from tracing the pattern to finishing the blouse, and God knows I’m a slow sewer! I finished the seams with my serger, which I’ve come to value more and more: it’s fast and easy, yet looks so professional.

airelle7My favourite part of the blouse has to be the collar: I can’t even begin to understand why so many people have sewn collarless Airelles, but different strokes for different folks… I appreciate the darts, too, which give such a flattering fit through the bodice.

airelle2It’s a nice little blouse that can be worn in a lot of different outfits. I have been wearing it both tucked in high-waisted skirts and untucked over jeans and, although I’m more used to my high-waisted skirts and think those kind of outfits are more my style, I couldn’t really tell which way I prefer it. By the way, those are Ginger jeans you see in some of the pictures, but more about them in a future blog post!

airelle5

Enregistrer

Enregistrer

Enregistrer

Enregistrer

Enregistrer

Enregistrer

Enregistrer

Yes Frills!

frilly2With time, I’ve learned to choose my knitting projects more and more wisely. It’s been years now since I’ve knit something and not had any use out of it. In short, I am usually pretty happy with my finished knit projects. But this one, ah, this one, I like it even more than the rest!

I first discovered the pattern years ago on Casey’s old blog: she had made an adorable turquoise version with white edging which had me convinced I needed the book it came from. Not that easy since it was out of print at the time. I had to wait for quite a long time before it was rereleased, but after months (years?) of stalking the designer’s website, finally, I could get my hands on it, and on volume 2 for good measure. These two books are chock-full of lovely designs I immediately added to my mental knitting queue, with this Frilly Jumper at the top, of course.

frilly1You know how knitting queues go (i.e. not fast), so it took me another few months (years?) before finally starting working on it. I knew I wanted a crisp white edging like Casey’s, but I agonised over the main colour for a while. Then I found this perfect red at Hema of all places (I didn’t even know they sold yarn until then), 100% cotton, and I got down to work.

Ravelry tells me it took me three months to knit, but I think it could have gone much faster had I had more free time during that period. It was an easy knit and the instructions were clear. I hesitated a bit over the size and chose to make a 76-81 cm (30-32’’) based on the finished measurements, which seemed plenty enough for my 33-34’’ bust. It was the right choice: the amount of ease is perfect for me and I love the fit of the finished sweater.

frilly4The only place I deviated from the pattern was the collar: the pattern has a four-piece collar, which I didn’t like at all. In fact, the thing I liked most about the pattern when I first saw it was what I thought was a ruffle collar. Ruffle, singular, not four ruffles. It’s only when I read through the instructions that I realised that there were indeed four separate parts to that collar. This made no sense to me, and I was so much keener on a one-piece collar frill, so I changed it. It was an easy modification: I simply knit one long neck frill of 342 stitches instead of four short ones, and seamed it up at the back afterwards. Apart from than that I followed the instructions for the small neck ruffles, only on a bigger width.

As always, you can find the rest of the technical details on my Ravelry, but this is the only consequent change I made.

frilly5This little summer sweater is one of my favourite knits ever, if not one of my favourite creations ever. It looks exactly like the picture I had in my head, and it goes with so many of my skirts… The only little thing I could criticise is the thickness of the sleeve frills, that prevents me from layering most of my long-sleeved sweaters over it. Still, the weather has allowed me to wear it a lot already, and I know it won’t spend a lot of time in the closet come the next warm season.

frilly3

Enregistrer

Enregistrer

Enregistrer

Enregistrer

Enregistrer

Enregistrer

Enregistrer

Enregistrer

Enregistrer

Enregistrer

Enregistrer

Pastel

pastel1Yes, another gathered skirt with giant pockets; yes, two new Ondée sweaters! I know, I know

What can I write that I haven’t written before, especially since the fabric I used for the Ondées is the same as for my first version, only in different colourways, and the fabric of the skirt is the same as for last week’s culottes, only with vertical stripes instead of flowers? I also used the remnants of the culottes for the pockets and the covered button, so really, nothing new under the sun. I even bought the fabrics in the same place.

pastel5Oh, but wait, I did use a new pattern for the pockets of the skirt! Burda 06/2015 #103a is a gathered skirt, so they only provide you with measurements, no pattern pieces, except for the pockets. I used my usual gathered skirt measurements instead of the pattern measurements, but I did use the pocket piece! I love those pockets: I can literally fit a cat in each one! Now if only my cats would cooperate.

pastel3I have been more into skirts that fall below the knee lately and I would have liked this skirt to do so, but I didn’t have enough fabric left after straightening the grain (I lost about twenty centimetres, grrrrr!), so this length had to do. Judging from the crazy amount of times I have worn this skirt in almost four months, I think I might survive the trauma.

pastel4I have realised since making the two Ondées (and two others after that, oops!) that I should have cut at least a 38 at the shoulders instead of a 36 like I did. It’s funny how at first you don’t see something, and then you notice it and it’s all you can see. I am now the proud owner of ten too-narrow-at-the-shoulders Ondées! Now that won’t stop me from going on wearing them. Also, being the positive person that I am, I see that as an opportunity to sew ten more! Silver lining and all that…

pastel2

Enregistrer

Enregistrer

Enregistrer

Enregistrer

Enregistrer

Culottes and a Eucalypt

jupeculotte1When leafing through Burda, I often need to look past the styling and always need to examine the technical drawings to fall in love with a pattern. Not this time. When I spotted the May 2016 Culottes (#110a), it was love at first sight. And at second sight when I looked at the technical drawing and saw their lovely scalloped front yoke. I needed those culottes.

You can imagine how happy I was when I found a very similar fabric to the one they used in the magazine at the Stoffenspektakel. So happy that I started working on the culottes right away instead of hoarding the fabric for a couple of years as is usually more my style!

I cut a size 40, graded down to a 38 at the waist/top of the yoke (it’s a low waist, so no need to go smaller than that). It was a pretty fast and uneventful make, the only difficulty being the angles of the scallops, where the scallops meet each other. Angles that I didn’t manage to sew correctly; mine are much more wavy than pointy as they appear to be on the technical drawing. But no one who didn’t see said technical drawing is going to notice that, are they?

jupeculotte5Aside from that, these culottes were a breeze to make. They are also quite nice to wear, especially in this fabric (I think it’s a polycotton), which, contrary to other blends I’ve used in the past, seems to have taken the best of both worlds: it presses really well, but it almost doesn’t wrinkle!

However, I don’t wear them very often. Why is that? Because, and I feel so stupid for not having realised and remedied that beforehand, there are no pockets… So, even though I find the culottes so cute and all, I don’t find them very practical, and I keep reaching for the pockets.

jupeculotte2The top I’m wearing with them in the pictures (I unconsciously composed an outfit that is very similar to the one in Burda, didn’t I?) is also a partial fail. I used Megan Nielsen’s Eucalypt tank and, looking at my previous versions of the pattern, I shortened the straps, thinking this would lead to a better fit. I also made a few changes just for this version, for aesthetical reasons: I made the straps thinner, deepened the neckline (front and back), shortened and widened the body and added a lace trim (from my stash; I had just the right length) at the bottom.

jupeculotte4I’m happy with my aesthetical changes, but the fitting change was kind of counterproductive: I feel like the fit of the top part is worse than before! And it leads to the shoulder seams falling too far towards the back and the whole top appearing asymmetrical: if I don’t put the shoulder seams back in place, the top seems shorter in the front and longer in the back.

Another thing I’m not happy at all with is the way my bias finished neckline and armholes look. At first they looked pretty good, but after a wash they wrinkled a lot, and no amount of pressing seems to be able to solve that. And yet I had prewashed both the fabric, a quality cotton lawn, and my bias tape, made from the same material.

jupeculotte3I’ve worn the top a lot this summer, both tucked and untucked, so I wouldn’t call it a total failure, but it’s always frustrating when a project doesn’t meet your standards, especially when you don’t understand exactly what went wrong! Ah well, I keep telling myself we are all bound to fail some projects from time to time, and that makes it only better when the next one is a success!

Brigiiiiitte!

VichyMint1When I came upon this mint gingham at the Stoffenspektakel with my partner in crime, I immediately thought of making it into a matching blouse and skirt.

I knew the skirt would be a simple gathered one with giant patch pockets, because you do not change a winning team, but I dithered on the question of the blouse. At first I wanted to make a Mélilot, then thinking I could wear it tied at the waist made me think about Camille’s versions of  this Burda model I had in my stash, and then I remembered Gertie’s pattern, Butterick B5895,  which I also had in my stash (is there a pattern I do not have in my stash, that is the question!), and the deal was done!

VichyMint3I went in search of reviews of the pattern, and a lot of them warned about the surprising amount of ease. I took a look at the finished measurements and chose to cut a size 6 instead of between a size 10 and 12 as the body measurements would have had me cut. Now, the ease wouldn’t have worried me so much was I going to use a drapier fabric, but with this light but stiff gingham I thought it would be wiser to go down a few sizes for fear of getting a much boxier blouse than I intended.

Another thing I read in a lot of reviews was that the blouse was very short. Once again I referred to the finished garment measurements (I also measured the length of the pattern pieces just to be sure) and I decided against modifying the length. But it’s true, the blouse is indeed very short: I suspect I am very high waisted and it falls right at my natural waist.

VichyMint4The pattern only has four pieces, but man do some of them look weird! The only tricky part to sew is the collar, for which you need to be very precise in your cutting, marking and sewing, and I found the instructions perfectly clear.

One thing that worried me was that the grainline does not run parallel to the centre front line, so I had to ignore the grainline on the front pieces for the plaid to be straight on the button bands. Fortunately, this did not cause any problem in the end, phew! The grainline isn’t parallel with the centre back either and I actually like the effect there, but I know it would have bugged me to no end if the gingham didn’t run parallel with the edge of the button bands in the front.

VichyMint5When I first tried on the finished blouse minus the buttons/buttonholes, I realized that going down two sizes and a half meant I should evidently have lowered the darts. So I set out to unpick the side seams and lower the darts by about 3/4’’. I think it was well worth the effort: here’s the before and the after.

After that all I had to do was add the buttons and buttonholes (actually not that easy when you want your centre front plaid to match!), and then make the matching skirt!

VichyMint6I don’t have a lot to say about the skirt, it’s yet another simple gathered skirt. Just like for the blouse, I took a lot of time pattern matching. Instead of pinning, I found it easier/faster (still very time-consuming) to baste the pieces together before sewing them. Once again, worth the extra time.

VichyMint2I like my little matching ensemble, but in fact I’m not sure I’ll ever wear the two pieces together. Separately, yes (already have), together, I don’t know. Perhaps it’s a little too over the top? I really don’t know, we’ll see! And worse comes to worst, I’ll still have a cute blouse and a cute skirt!

Enregistrer

With a Cherry on Top

Cherry1Hello! It’s been awhile hasn’t it?

Here is the last garment I sewed, a Sewaholic Saltspring dress! The fabric is a lovely rayon I bought from Goldhawk Road during a day trip to London with Mimolette last March. It’s not as drapey as the pattern recommends and actually looks more like a very lightweight cotton, but I think it works pretty well for this dress nonetheless. And it was suprisingly nice to work with, too, since it behaves like cotton. The only downside is that I need to press the dress after hanging it to dry or it looks a little bit crumpled and sloppy. Fortunately, it doesn’t wrinkle too much when I wear it, just when I wash it.

Cherry2I love love love the finished dress! And I also loved working with the pattern, which I found very well thought-out. I now understand why everyone kept raving about the shorter lining that helps keeping the blousing in place: it really does its job! I French seamed the skirt seams, and the bodice construction (at least without a zipper) encloses all raw seams, so the inside looks very neat. Also, thumbs up for the sew-along method for turning the straps right side out with a bobby pin: so easy, worked like a charm!

Cherry4It’s an easy pattern as is, but I made it even easier by omitting the zipper. I didn’t like the look of the partially open back of the original version, and I had read that one could put on the dress without a zipper, so that was a no-brainer.

To eliminate the zipper, I cut the back skirt on the fold instead of in two pieces. I could have done the same for the back bodice, but I didn’t think of that before I had already cut it in two pieces, so I just seamed it shut. This accidental back seam turned out quite handy to differentiate the front from the back when I’m getting dressed!

Cherry5Another modification I made was to sew an in-between version of the skirt, lengthwise. I added 20 cm to the shorter version, because I wanted my dress to have a late 70s, early 80s flair.

Cherry6You may have noticed that I’m wearing a cherry necklace in the pictures. When I finished the dress, I felt like it demanded to be worn with a cherry necklace, so I obliged and made one, since I didn’t own any! I’m fairly chuffed with the result, which I intended on wearing only with this dress, but have actually been wearing with an unexpected amount of outfits! The cherries and leaf are polymer clay and the stems pliable jewellery wire.

Cherry3This exact outfit has been my favourite one this summer. It’s a shame it’s not the kind of dress I can see myself wearing with tights and cardigans to transition it to fall, but at least I’ll be looking forward to wearing it again next summer!