Gingerly Yours

ginger34Can you believe I have spent the last two years without a pair of jeans, or without a pair of trousers for that matter?! The only thing resembling trousers in my wardrobe were these 3/4-length jeans, only wearable in summer. The rest of the time: not a single pair!

I’m more of a skirt/dress wearing kind of woman (duh!), but still, no pair at all had started to get a little tiresome. I’ll choose a skirt/dress over a pair of jeans 99% of the time, but I’ve come to realise I need jeans for the remaining percent. I mean, how stupid did I look hiking in a dress and tights last winter? 😀

gingerprofilThe reason I spent so much time without a somewhat essential piece of wardrobe is that well-fitting trousers are close to impossible to find in shops for me: there is a 36 cm difference between my hips and waist, which means that shop-bought trousers that fit my waist will never (and I mean never) go past my hips, and the ones that go past my hips will inevitably gape at the waist. The best I could aim for were ones that didn’t gape so much that they were completely unwearable, but really, I have actually never owned a pair of perfectly fitting trousers. The ones I’ve linked to in the first paragraph were one of my best fitting pairs, yet they gaped enough at the back that I always needed to cover the waist.

gingerfaceBy the way, I’d like to stress the fact that I’m not complaining about my body shape, but about the fact that I couldn’t find trousers that fit that shape. I’m insisting because absolutely every time I have happened to talk about the objective size difference between my hips and waist, there have been people to tell me that I should not be saying that, that I’m not fat and God knows what, as if simply acknowledging (and, let me insist again, not complaining about) a particularity of my body was the same as criticising that body. We all have different bodies, there’s nothing negative in identifying what makes ours different from the accepted norm. Also, people automatically jumping to the conclusion that wide hips = negative kind of puzzles me, but whatever.

Now that’s off my chest, let’s talk about MY FIRST EVER PAIR OF WELL FITTING JEANS! 😀

gingerface2When the Closet Case Ginger jeans first came out, like a lot of people I was kind of tempted, but also kind of intimidated. What worried me was the fitting part. I remembered from the Clover-craze a few years ago that trousers seemed an absolute nightmare to fit, and I wasn’t feeling up to the task. Still, when the Ginger pattern was on sale and I found the perfect dark stretch denim (for €3! – and it is surprisingly good quality!) at Tissus Passion, I gave in. And finally, a few months later, I mustered up the courage and started cutting. What was the worst that could happen after all? Wasting less than €6 of fabric? Spoiler alert: I didn’t waste a single cent!

gingerdosIn a bout of mad optimism, I opted for the high-rise skinny version. I had never in my life even tried on a pair of skinny jeans, but I thought, there’s always a first, and I was curious… My fabric is pretty stretchy, so I went down to a size 10 in the hips instead of what should have been a 12. Also, I didn’t dare grading up or down too many sizes and the jeans are not supposed to fall at the natural waist but a little bit lower, which is why I chose a size 8 for the waist instead of a 4.

So at first I simply graded from a size 8 waist to a size 10 hips, and I tried on the basted jeans (without waistband) as advised in the sewalong and in the eBook. I was pleasantly surprised to discover that the fit was already quite good! I just needed to take a wedge out at the back yoke. And before finishing the jeans for real, I tried on the waistband and simply cut off the excess after attaching it to the jeans. Right below are my modified pattern pieces for reference (click on the image to enlarge): in red are the changes I made before even cutting the pattern (i.e. simply grading between a size 8 and a size 10) and in green (only on the yoke piece) the wedge I took out after trying on the basted jeans (the broken line is the seam line, the solid one adds a 5/8” seam allowance). I didn’t transfer the changes I made to the waistband piece, but this will be easy to measure on the finished jeans before I remake a pair. Do not pay attention to any orange marks on the pattern pieces; these are just traces left by the tailor’s chalk.

gingermodifsI mentioned above that I used Heather Lou’s Sewing Your Own Jeans eBook. It was nice having all the info in one place, as well as some additional information that wasn’t included in the sewalong, but what I found most useful is all available for free in the sewalong. So if you need even more hand-holding than in the sewalong, I’d recommend it as it’s so well thought out, but if you don’t, well, it’s far from mandatory to get a nice looking pair of jeans.

And the pattern itself is so impressive! I have read here and there that the fly front zipper insertion method alone made it worth a buy (or a peek at the sewalong! 😉 ) and it’s true, really; I defy you to fail your zipper insertion following this method. But the rest of the pattern is so worth it, too. Everything is so well explained and carefully thought out, I think even a confident beginner could take it one step at a time and get more than satisfying results in the end.

gingerdetails2As you may have understood by now, I am positively ecstatic about my Ginger jeans. There are a few small details I’d like to improve on for a future version (I’d like my topstitching and bar tacks to be more regular next time – I hope not to sew the next pair on the same low range plastic sewing machine though, so this should be achievable! 😀 – and I’d also maybe lengthen the legs a little bit and move the pockets a tiny bit more towards the centre, which are pretty simple changes), but they look so much better than what I had imagined! And they are so comfortable (as proven here)! I love the comfort of the high waist (hitting me around the belly button) and the pocket stay does its job in keeping everything in place: it’s so nice not having to adjust the pockets in place every time you put on the jeans.
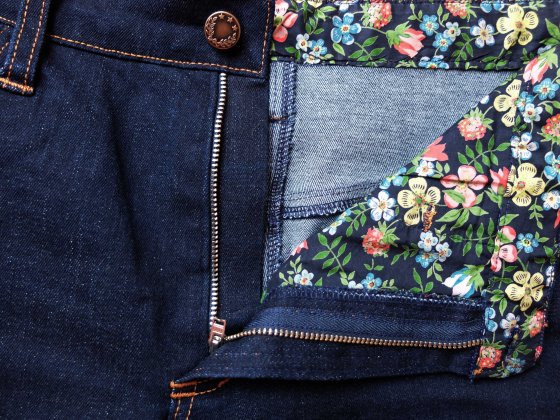
gingerdetails1I used some Liberty tana lawn remnants (from this dress and this blouse) to line the pockets and waistband. I chose gold topstitching thread and copper coloured button and rivets for a classic jeans look.

I also made the Breton top I am wearing in the pictures. It’s a Sewaholic Renfrew I modified slightly: I changed the shape of the neckline and I simply turned and stitched it instead of adding a neckband; I also omitted the sleeve and hem bands, lengthened the sleeves and added slits at the sides of the bottom hem. What really makes the top is the fabric, of course. I bought it online from Un chat sur un fil, but it was at least two years ago and I don’t think they have it in stock anymore. It’s 100% cotton, quite thick and it doesn’t have a lot of stretch for a knit. It has pilled a little bit around the spot where the shoulder strap of my bag rubs, but nothing anyone but me is going to notice, I think. I still have enough fabric to make another tee, so when this one bites the dust I can make its clone, phew!

gingerdos2Now can I get back to waxing poetic about the jeans? Just kidding, I’m already embarrassed enough at the sheer length of this post! Please cut me some slack: I MADE JEANS!

Enregistrer

Enregistrer

Enregistrer

Enregistrer

Enregistrer

Enregistrer

Enregistrer

Enregistrer

Enregistrer

Enregistrer

Enregistrer

Enregistrer

Enregistrer

Enregistrer

Enregistrer

Enregistrer

Enregistrer

Enregistrer

Enregistrer

Enregistrer

Enregistrer

Enregistrer

Enregistrer

Enregistrer

Enregistrer

Enregistrer

Enregistrer

Enregistrer

With a Cherry on Top

Cherry1Hello! It’s been awhile hasn’t it?

Here is the last garment I sewed, a Sewaholic Saltspring dress! The fabric is a lovely rayon I bought from Goldhawk Road during a day trip to London with Mimolette last March. It’s not as drapey as the pattern recommends and actually looks more like a very lightweight cotton, but I think it works pretty well for this dress nonetheless. And it was suprisingly nice to work with, too, since it behaves like cotton. The only downside is that I need to press the dress after hanging it to dry or it looks a little bit crumpled and sloppy. Fortunately, it doesn’t wrinkle too much when I wear it, just when I wash it.

Cherry2I love love love the finished dress! And I also loved working with the pattern, which I found very well thought-out. I now understand why everyone kept raving about the shorter lining that helps keeping the blousing in place: it really does its job! I French seamed the skirt seams, and the bodice construction (at least without a zipper) encloses all raw seams, so the inside looks very neat. Also, thumbs up for the sew-along method for turning the straps right side out with a bobby pin: so easy, worked like a charm!

Cherry4It’s an easy pattern as is, but I made it even easier by omitting the zipper. I didn’t like the look of the partially open back of the original version, and I had read that one could put on the dress without a zipper, so that was a no-brainer.

To eliminate the zipper, I cut the back skirt on the fold instead of in two pieces. I could have done the same for the back bodice, but I didn’t think of that before I had already cut it in two pieces, so I just seamed it shut. This accidental back seam turned out quite handy to differentiate the front from the back when I’m getting dressed!

Cherry5Another modification I made was to sew an in-between version of the skirt, lengthwise. I added 20 cm to the shorter version, because I wanted my dress to have a late 70s, early 80s flair.

Cherry6You may have noticed that I’m wearing a cherry necklace in the pictures. When I finished the dress, I felt like it demanded to be worn with a cherry necklace, so I obliged and made one, since I didn’t own any! I’m fairly chuffed with the result, which I intended on wearing only with this dress, but have actually been wearing with an unexpected amount of outfits! The cherries and leaf are polymer clay and the stems pliable jewellery wire.

Cherry3This exact outfit has been my favourite one this summer. It’s a shame it’s not the kind of dress I can see myself wearing with tights and cardigans to transition it to fall, but at least I’ll be looking forward to wearing it again next summer!

Déjà Vu

DéjàVu2Here’s the last Ondée I hadn’t photographed yet, with a Hollyburn skirt I made back in May!

That Hollyburn is more of a summer skirt and I wouldn’t wear that outfit in real life since I don’t like such a light-coloured skirt with dark tights, but I don’t hate it either so I took the opportunity to blog those two garments at once, especially since I don’t have anything new to say about the Ondée sweater (same size as usual, same fabric as the blue version).

DéjàVu3I had already sewn a Hollyburn skirt, which was actually the first garment I ever posted on this blog. I love and have been wearing that winter version so much that I wanted another one for the warmer months. I bought the fabric with that exact project in mind at Gotex at least two years ago, but so many projects, you know how it goes…

DéjàVu4It’s always a bit of a disappointment when a project you have been thinking about for so long doesn’t turn out as perfect as in your head, which is the case with this one. I blame the fabric: although it looks like a sort of chambray, it’s in fact a polyester/cotton blend, and, just like the one I had used for my Centaurée, it has taken the worst of each component: while the cotton means it wrinkles easily, its polyester part won’t take a press! This was definitely my last time ever sewing such a material.

DéjàVu5I have been trying to lower my fabric stash (no pledge or anything, just trying to remain conscious of what I already have and stop overbuying like I used to – I have to say it’s been working pretty well!) and I didn’t want to keep the small remnant that was left after cutting the skirt, so I made the belt loop version and I sewed a matching bow belt to go with it. I used Tilly’s tutorial (in her book, but you can find it on her blog, too), and I added two snaps to make sure the ends stayed in place.

DéjàVu6Weirdly, despite my qualms about the fabric, a less than perfect zipper insertion and the fact that that skirt shape in a light colour probably isn’t the most flattering shape on me from behind, I still like the skirt a lot. I made it a little bit longer than my first version, which I have always thought was a tiny bit too short to my taste, and, I completely forgot to take a picture of that, but to finish the hem I used some light blue bias tape with white polka dots. Since it was destined to be a casual summer skirt, I didn’t line it, and I used my serger to finish the seams.

DéjàVu1

Christmas Eve Outfit

Réveillon4It’s been a long time since I posted a finished garment, and here I am with some of the crappiest pictures I’ve ever posted on this blog, but they will have to do or I’ll never show you any of the last pieces I made, what with winter and its crazy lack of daylight…

I took these coming back from work yesterday around 3 p.m. (lucky me finishing so early! 🙂 ) and I barely had enough light long enough to take them.

Réveillon1So, this is the outfit I made to wear on Christmas Eve. Last year I made the dumbest choice by wearing this skirt which, although very comfortable for daily wear, became an instrument of torture after I had ingurgitated Christmas dinner. Which is why this year I decided I needed the most ample dress possible in order to eat as much as I wanted and not feel like my clothing was trying to kill me.

Réveillon2Enter my beloved modified babydoll Renfrew dress that could hold triplets and a whole turkey! I sewed the waist gathers the same way as for this one (this gathering method makes for a very loose-fitting waist), the sleeves are 3/4 like on this one, but I used a different method for the neckline: for once I didn’t use a band but simply turned under the neckline edge twice. I felt it was dressier.

Réveillon3The sleeves are wide enough for me to layer a 3/4-sleeved T-shirt under the dress for maximum Christmas (and cold weather in general) cosiness. I did not add pockets for lack of time, but I’ll probably add some in the near future because I keep reaching for them when I wear the dress, and of course I don’t know where to put my tissues.

Réveillon5The cropped sweater started its life as a whole nother project. I wanted a cosy sweater dress made from this glittery sweater knit I had recently bought, but when I tried it on I realised it looked positively awful on me! I have no problem wearing things that don’t make me look as thin as possible, or that make me look pregnant for that matter (I guess the outfit I’m showing you today kind of proves my point! 😀 ), but I do wearing things that make me appear deformed! I put the dress aside, feeling there might still be a way to rescue it, and when I started thinking about my Christmas outfit, I immediately thought simply cropping it might make it the perfect companion to the little black babydoll dress I had in mind. And indeed it did!

Réveillon6

I must have been Captain Harlock in a previous life!

I also cropped the sleeves, which were about as unflattering as the rest of the dress when they were full-length. Since my fabric has mediocre stretch recovery, I put some wide elastic in the cuffs to prevent them from getting distorted over time. It does feel pretty stiff, which was weird at first, but it doesn’t bother me anymore.

The original collar of the dress also stood very weirdly and/or didn’t suit me at all, so I simply turned it under and topstitched it in place. I was surprised by how good it looked after this simple transformation!

Réveillon7I have been wearing this exact same outfit a lot since Christmas, but I haven’t worn the two pieces separately yet, which is weird since a black dress and a neutral sweater (gold and silver are neutrals to me – I’m not even kidding!) shouldn’t be too hard to combine with the rest of my wardrobe. I guess I just like them so much together!

A Dash of Rainbow

Rainbow2Hey, I made something that doesn’t go on the head!

These past weeks I had been craving some sewing time like you wouldn’t believe, yet when I was finally relieved from all of my obligations I found myself actually dreading and postponing my getting back to sewing, like I was afraid I wouldn’t even know where to begin and I would end up with a failure that would put me off sewing altogether.

Rainbow1So I decided on a pattern I’ve made before and I know fits and is easy, the Renfrew. With the warm weather we’d been having (where is that warm weather now?! It’s been raining non stop for days!) I came to realise that my summer wardrobe, me-made or otherwise, was almost non existent (Mr Picky begs to differ). I need summer dresses, skirts, tops, shorts, everything!

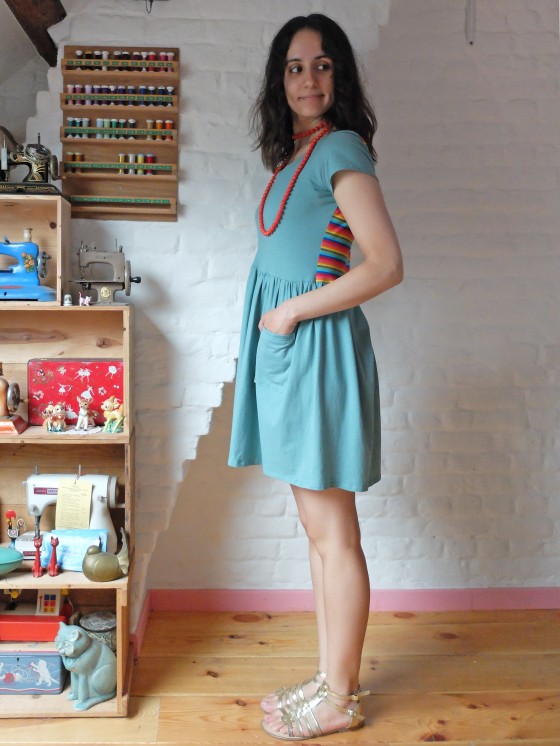
Rainbow3I started with a summer Renfrew dress: short sleeves, gathered skirt and a lot of ease at the waist to let that summer breeze in. To get that result at the waist, I didn’t use any elastic for gathering, I just gathered the regular way (but with only one row of thread instead of three so that it would be easier to get rid of that seam) then serged the seam, hoping the gathering row would be cut off by the serger knife. Worked like a charm.

Rainbow7As per usual I “drafted” (such a pompous word for what was actually involved) my own neckband piece, and I also omitted the sleeve bands for the sleeves not to stick to the arms (here’s that summer breeze again!). And as per usual I added some simple patch pockets, because I need pockets on my dresses and I like the look of patch pockets, they help visually structure the skirt.

Rainbow4As you can sort of see in the picture above (and clearly see in the two pictures below), the dress seems solid from the front, but it’s not, there’s a suprise rainbow at the back! I love that detail: the dress looks so classic at first sight (and if I wear a cardigan over it), but it has that little something special.

Rainbow6This was really the perfect project to get back on my (presser, mwahaha!) feet. I’ve already been wearing it almost everyday, though only once styled exactly as in the pictures. The rest of the time it had to be accompanied by tights (in July!), a jacket and rain boots.

Rainbow5And from as soon as I started working on it, but even more so since I finished it, I’ve been feeling ready to tackle projects that are a little more challenging, i.e. ones that I haven’t already sewn before. The next one, which I’m working on at the moment, is a chambray Centaurée dress!

Enregistrer

Blue Stripes

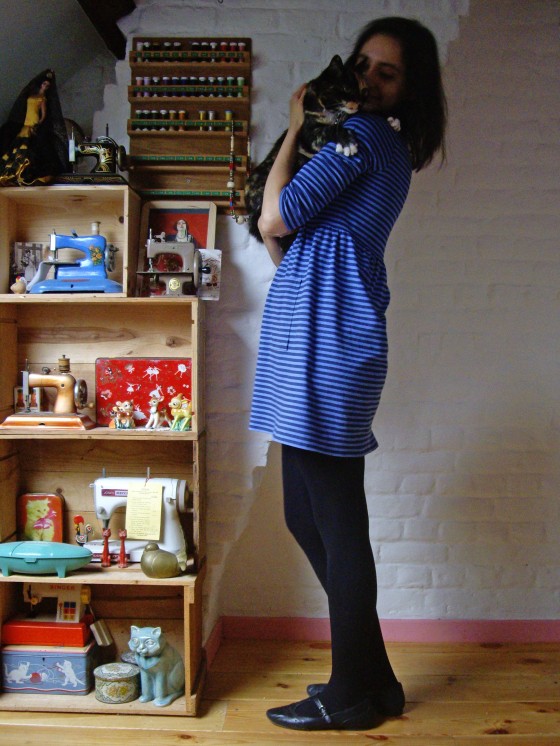
BlueStripes2Woohoo, it’s a dress, not a tunic! And I felt totally at ease when wearing it to work, so it’s not even one of those projects I can only wear when I’m not working! And I love it, it’s very me! And it’s soooo comfortable! And, and, and… !

BlueStripes3In short, if only I had known when to stop the first day I worked on it, this could have been the perfect sewing project! But I didn’t stop when I was tired and it made me both use pins that were too thick (and blunt!) for the fabric, resulting in tiny holes at the side seams (where I had to pin a lot to match the stripes), and… cut a hole in the bodice with the serger blade while serging the waist seam! Twice. That’s how I lost a few centimetres of the bodice and ended up with a babydoll mini dress instead of a high waisted normal one.

BlueStripes4

Just checking… Yes, I can raise my arms without revealing too much!

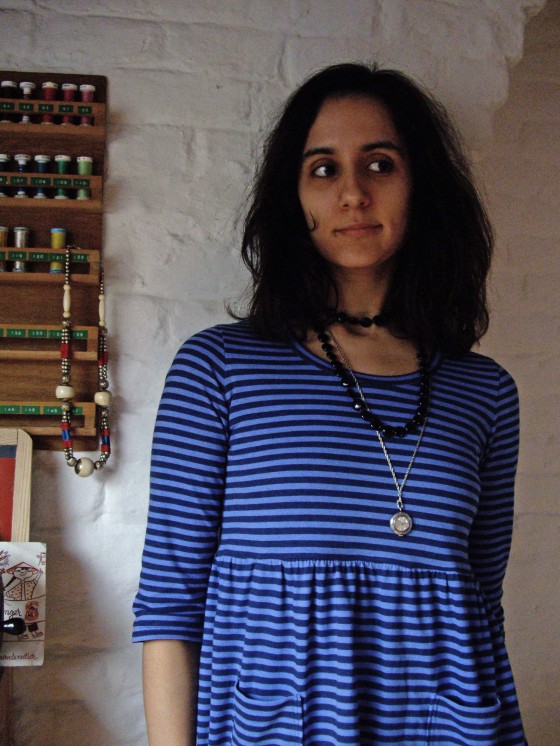
But I’m pretty proud of myself because for once I didn’t freak out, I just thought ok, how do I fix it, and fix it I did! Also, I’m terribly happy I chose to use this cheap fabric to test run the dress I had in mind instead of the precious fabric (like really precious: there are foxes involved!) I eventually plan to use.BlueStripes5The stripes are still a bit uneven at the waist seam on my left side, but I didn’t think I could fix that without loosing too much length. I first wanted to cover it up with a bow, but I finally chose to let it be, and I must say I don’t see it anymore unless I’m looking for it specifically.BlueStripes6As I said when I showed you my sketch of the dress, the pattern is Sewaholic’s Renfrew top. I changed the top into a dress by adding a gathered skirt. I also added patch pockets (I love patch pockets: easy and cute!) and I omitted the sleeve bands (and lengthened the 3/4 sleeves) and cut my own collar band. I gathered the skirt with elastic, but when I had to redo the waist seam, the elastic got cut away, which resulted in a looser fit, perfect for a babydoll dress.

BlueStripes1I took the pictures coming back from work yesterday, so this is the exact outfit I wore to work. I really don’t understand why black and blue shouldn’t be worn together, so I refuse to abide by that stupid rule!

Wearing a garment as soon as I’ve finished it is usually a sign of success, so I feel like I can say without a doubt that this dress will be worn a lot! I hope the couple tiny holes at the side seams won’t shorten its life too much, and I actually plan on mending those to prevent them from getting bigger. Anyway, let’s hope I learn from my mistakes and my next version goes without a hitch!

Sketchbook: Blue Stripes

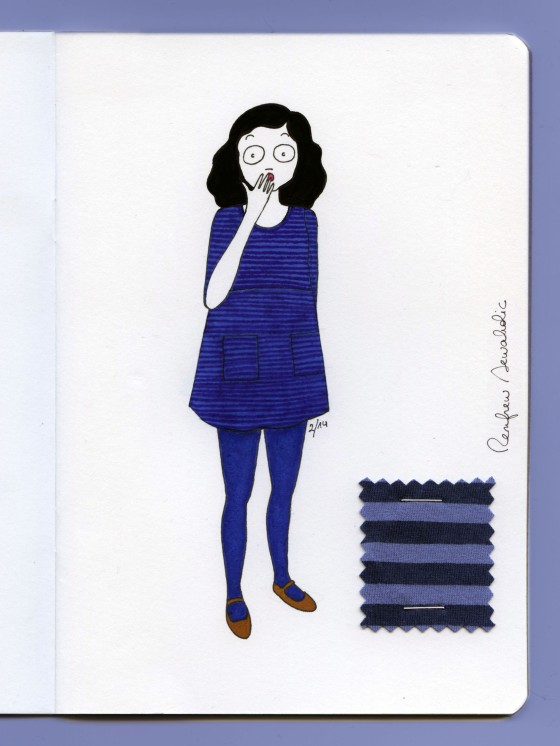
BlueStripesI usually stick to one project at a time, but I’ve been soooo bored with my babydoll coat that I’ve allowed myself to put it aside and work on one or two easy projects before getting back to it. And what better suited project than the Renfrew? Especially since it’s not my first go at it, which means no more tracing/cutting the pattern and I know it fits!

Even so, I have already encountered a few obstacles: first, with only 1,30 m of the fabric I chose, I had to do some creative cutting in order to get a 3/4 sleeved dress out of such small yardage. Then I forgot that I’m no good at sewing after 9pm and went on sewing and making stupid mistake on stupid mistake… to the point where I had to shorten an already short dress in order to hide one of them.

Anyway, the dress is almost complete now, and it looks promising (albeit short) after all. See you soon with a new dress!

Hollyburn Hat

HollyburnHat1Remember this skirt? It was the first project I ever posted on my blog! I had been meaning to make a matching pillbox hat with the fabric remnants ever since I completed the skirt; I even had all of the materials ready, but it took me all of nine months to finally get to it!

HollyburnHat2I used a two-piece premade buckram form which I covered first with a layer of wadding, then with the fabric. Everything but the back seam of the fabric is hand sewn, which allowed me to work on that project mostly from my coach (why do you think I love hand sewing so much?)!

HollyburnHat3Why Hollyburn hat, you ask? Well, first because it’s made from the same fabric as my beloved Hollyburn skirt, a tweed/chevron wool with golden thread woven in, and second because I used the pattern of the waistband tabs of the skirt to add a double tab at the back of the hat! I also used the same wooden buttons as on the skirt: I had bought four especially to make a matching hat!

HollyburnHat4

Here you can see the fabric and double button tab better, as well as the matching skirt…

HollyburnHat5

… And here you can sort of see some of the golden thread that’s woven in the fabric. Much more visible in real life.

HollyburnHat6I lined the hat with the same lining as the skirt, beige Venezia, and I added a beige petersham ribbon. The only thing that doesn’t really match is the ribbon I used to secure the comb (the comb helps the hat stay on the head), but blue was all I had in stock the evening I finished the hat and I didn’t want to wait until the next morning to go and buy some. I don’t know how many of my projects feature that same ribbon: I have a lot of it in my stash, so every time I need some ribbon (to stabilize shoulder seams for example), that’s the one I use.

I’m really happy with the outcome of this hat, which is pretty exactly what I had in mind, and quite proud of the finishing details. The only problem is it’s not the easiest type of hat to wear nowadays (ah, to live in the sixties!), but I can still see myself wearing it from time to time when going out. Though my boyfriend might disagree on that one. His comment when I proudly showed him the finished hat: “Oh cute, perfect for when you go fox hunting!”.

Camper Tee

Camper1Pretty close, huh?

This isn’t my first project of 2014, but my last project of 2013, which I finished ten days ago, but couldn’t find the time to photograph in between holiday activities. You may have seen the sneak peek I posted at the end of the picture overview of my projects of 2013.

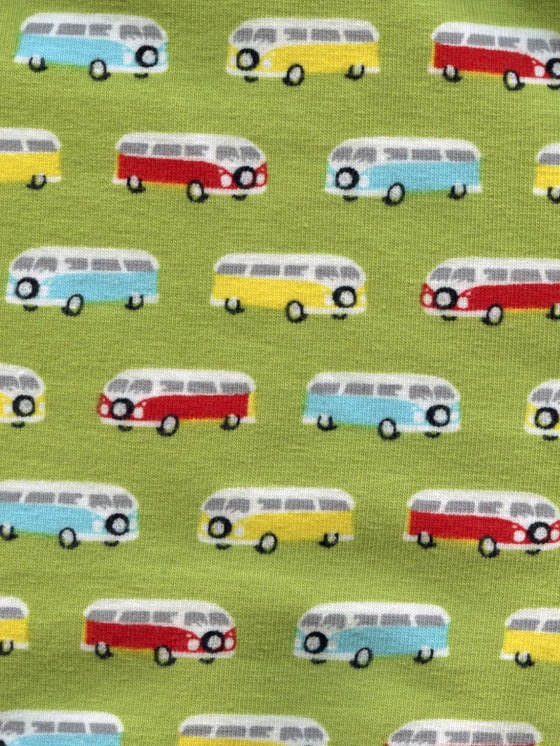
CamperFabricThe fabric is this adorable cotton jersey knit with a retro VW Camper print from de Stoffenkamer (not available anymore, I’m afraid). It was quite nice to work with in that the edges didn’t tend to curl and it was pretty stable, yet I almost lost my mind when cutting because the print was a smidge off grain, which made it impossible to both place the pattern pieces on grain and keep the campers horizontal. I chose to keep the campers horizontal because it really jumped out at me otherwise, yet I was afraid it would cause the tee to hang funny. But it’s actually subtle enough that it looks totally okay, phew!

Camper2With everything going on, I didn’t even try matching the pattern at the side seams of course, but I don’t think it’s obvious at all on the finished tee.

The pattern is Sewaholic’s Renfrew, which I cut in a size 4, one size smaller than my measurements, because I wanted it to be closer fitting, and I’m really happy with the fit. I omitted the hem band (stitched the hem with a double needle) and I cut my own neck and sleeve bands, in off-white cotton ribbing. The sleeve bands provided in the pattern were too wide for my taste, and the neck band seemed so hugely long I don’t know that it would have sat properly.

Camper3Other than that I made no modifications, that’s the joy of working with knits! Also, this was my first time using my new serger and I must say, even though it’s definitely not indispensable to sew knits, it still makes for a much cleaner finish.Camper4In any case, I can see myself wearing this tee a lot as I think it will look very cute tucked in my Hollyburn, Beignet and Chardon skirts. And I’m pretty sure that this is won’t be my last time using the Renfrew pattern!

WIP: Retro Camper Tee

CamperTeeI don’t know how long I’ll keep up with it, but I’ve decided to start a sketchbook where I make a small illustration of each sewing project I begin, in the hopes it will encourage me to draw more frequently.

This is the first one, a Sewaholic Renfrew made from a cotton jersey knit printed with retro Volkswagen Campers! I chose a contrasting off-white cotton ribbing for the neckline and sleeve bands (and no bottom band).

This is also the first project where I’m using my new serger! So far it’s coming along nicely, except for the fact that the jersey knit is printed a touch off grain, which drove me kind of crazy during the cutting.