Olive Cardigan

This cardigan is almost one year old. I finished it right before last spring, which, for such an autumn coloured sweater, was maybe not the greatest idea. I was just starting to crave pastel and other spring hues, so it felt like I wouldn’t want to wear that cardigan a lot.

But strangely I did wear it a lot, and I didn’t even wait for September for that. I say strangely, but I guess the ever fall-like Belgian weather must have helped quite a lot.

I had bought the yarn (Drops Karisma, colour #57 olive) for this sweater in 2014, at my beloved local yarn shop, which has since closed. I had another much longer sweater in mind at the time, but when I decided to knit the Wainthropp cardigan, I didn’t want to buy any yarn unless I didn’t have anything suiting it in my stash. So I said goodbye to the long sweater and opted for the safest bet, yet another Andi Satterlund sweater, my eleventh if I’m not mistaken! 😀

I modified the button and neck bands: I didn’t like the garter stitch ones of the pattern, so I changed them for twisted ribs, matching the waistband and sleeve cuffs. As usual, I wrote down the details on Ravelry. The buttons are from my stash, once again salvaged from an old garment by my mother.

What more can I write about this cardigan from a designer I’m used to, knit in a yarn I’m used to? No much I guess, except that I’ve recently realised that, weirdly, I have a tendency to knit cardigans in fairly dull colours. It’s particularly obvious when you see them all together. My only bright cardigan was this one, but I’ve just got rid of it because it was too worn and damaged. It’s strange because I think of myself as someone who loves colour and is not afraid to wear bright colours even in winter, yet my sweater shelf says otherwise. Something to keep in mind the next time I buy some yarn!

At Least It’s Not Easter Yet!

Ho ! Ho ! Ho !

Christmas has come and gone, but I’d rather not wait a whole year to blog this little knitted hat. And my Christmas tree is still up, so…

Fandangle2The pattern is Fandangle by Andi Satterlund, and it was my first real stab at stranded colourwork (this sweater I made in 2014 featured a tiny bit of stranded colourwork). I found it a bit tedious to knit, although not really complicated. I just don’t like dealing with two strands at the same time. But I’m not really happy with the way my ornament motifs look: at first I thought I had pulled the floats too tight (despite making all efforts not to), but I have since realised that I was simply not supposed to cross the strands behind each and every stitch, duh! Ah well, it doesn’t look catastrophic and I don’t even think about it when I wear the hat, and at least now I’ve learnt my lesson!

My hat also fits tighter than intended (a what? A gauge swatch?!), but that’s not really a problem: at least it feels secure on the head, even with the weight of that HUGE pompom I made!

The yarn is Drops Flora (#01 off white and #18 red). It was my first time using it, but I was on familiar ground since it’s similar to Nepal, one of my favourite yarns, only in a different weight.

I started knitting this hat a few days before Christmas last year and finished it two to three weeks later, too late to wear it that same year. So I put it away, and I was very glad to find it waiting for me at the beginning of this festive season. I’m pretty sure I’ll be just as happy to pull it out of its drawer again come next Christmas!

Vintage Lace

The last garment I posted on this neglected blog was a knit, so I hesitated posting this one for a minute. Then I realised, why would it even be a problem to post two knitted garments in a row, especially with a five months hiatus in-between? I’ve also completely abandoned any effort to present my creations in the order I made them and this knitted top is the last thing I finished. This hasn’t stopped me from wearing it a couple times already!

The day I took the pictures was my first day back at work after the summer holiday and what you see here is the exact outfit I wore that day. I came back home and suddenly thought, hey, why don’t I take some pictures of this top for my blog? This hadn’t happened since last March apparently… It took me ten minutes, fifteen tops, which makes me think I really need to get back into the habit of taking pictures when I’m wearing something I haven’t blogged yet.

This is my version of Andi Satterlund’s lovely Zinone top pattern. As soon as I first saw the pattern when it was published, I knew I wanted to make the cropped version (duh) with the full-lace back, in off-white for a vintage lace effect. I of course turned to my go-to yarn brand where I immediately found what I was looking for, DROPS ♥ You #6 in 101 off-white.

I didn’t bother knitting a gauge swatch and, well, I should have! I knit the whole body down to just before the waist ribbing when I realised it looked kind of short and, more annoyingly, the armholes looked tiny! I tried on the top and the armholes were indeed too small to be comfortable. I also measured it and compared the measurements to the pattern schematics: the width was pretty perfect, the length, not so much… This is when I at last thought of checking my gauge: not surprisingly, the stitch gauge was spot on, but the row gauge was much too tight!

I was on holiday in Spain at the time and knew I was going to get lots of quality knitting time in the following two weeks, so it wasn’t too much of a pain ripping out the body up to the armholes. I then added twenty more rows to said armholes (front and back) and went on to knit the body a second time. I intended on adding more rows to the body, too. However, when I reached the waist ribbing again, I got the impression that the length I had added to the armholes might prove sufficient once I knit the ribbing. This was confirmed when I tried on the finished top: although shorter than intended by the pattern, it is the perfect length for the high-waisted skirts I want to wear it with.

The only thing I am not entirely happy about with this top is that I didn’t think of adding any depth to the neckline: the row gauge discrepancy means that I should have added some rows there, too, in order for the neckline to be as deep as intended by the pattern. I didn’t think about that until I had knit the i-cord edging at the very end and saw that the neckline had ended up higher/smaller than it should have. Luckily this doesn’t make the top too difficult to get on and off, phew! It’s one of those errors you don’t even think about when you wear the finished garment (I would have completely forgotten about it had I not mentioned it in my Ravelry notes)… Speaking of the neckline, how nice does the i-cord bind-off look? It was my first time trying this method and I had a bit of difficulty understanding why I was doing what I was doing at the very beginning, but I decided to trust Andi’s instructions, and rightly so.

Between the fact that I didn’t get a lot of time to knit at the end of the last school year and that I almost had to knit it twice because I didn’t check my gauge first, this top took way more time than I thought it would from start to finish. I am glad that I managed to finish it and wear it a few times before summer leaves us for good, though, as it would have been a bit of a shame finishing it and not being able to wear it even once before next spring!

Enregistrer

Enregistrer

Enregistrer

Enregistrer

Enregistrer

Enregistrer

Enregistrer

Enregistrer

Enregistrer

Enregistrer

Enregistrer

Enregistrer

Enregistrer

Enregistrer

Enregistrer

Enregistrer

Enregistrer

Enregistrer

Enregistrer

Enregistrer

Gato Morado Cardigan

The last time Monsieur and I were in Madrid, we came upon the cutest yarn shop, El Gato Negro, during an evening walk. It was closed at the time, but it looked very promising from the outside, so I noted down the address in order to come back the next day while Monsieur spent the day at the Prado.

Man was I right! The shop was chock full from floor to ceiling of a rainbow of yarns! There were mostly synthetic blends in there, but there was also a nice selection of natural fibres, at very affordable prices! There were little samples on display, and the yarn was sold by weight. I spent a shameful amount of time browsing the samples and in the end I chose a 100% wool in this gorgeous purple. There was no label on the skeins and not a lot of information available in the shop, only a small tag with the name of the yarn (“Especial”), its composition (100% wool) and its price (€60/kg – I bought 600g and I used a little under 300g for this cardigan).

EDIT (06/06/2017): Here is the yarn in question (colour #61 I’d say)! Hmmm, and apparently it’s supposed to be used for tapestry weaving or embroidery, not knitting… I would totally use it to knit a sweater/cardigan again though!

I knew I wanted to knit a cardigan, but I had no idea which one. Back in Brussels, we went to a yard sale where I found a series of old buttons (I’ve already used some of the black ones on my starry Cardamome), among which were these purple ones I hoped I would be able to use on the same project as my Spanish yarn.

Not long after, Andi Satterlund published the Blaster cardigan. I immediately thought of my purple yarn (and buttons!), but I was not sure it had the correct gauge. I was actually not sure what its gauge/weight was at all, nor which needle size it called for. It looked either sport or DK weight, but I had to knit a gauge to check. I tried 3,5 mm needles first, but the fabric seemed too tight, so I changed to 4 mm ones. These gave a much nicer result… and actually got gauge for the Blaster cardigan! Now if that wasn’t fate…

The only modification I made to the pattern was lengthening the sleeves. I’ve come to realise wool cardigans with 3/4 sleeves are not the most practical for me, so that’s an adjustment I often make. I simply went on knitting and decreasing until I got to the length I wanted. I seem to remember that the number of stitches I got at the very end of my sleeves, pre-eyelets and ribbing, didn’t suit the eyelet pattern and that I decreased two at a time on the last row to adjust for this.

Other than that, I followed the pattern as written. It was my tenth time knitting an Andi Satterlund sweater, so it was smooth sailing.

The yarn was very nice to work with, too. It’s a little bit drier than what I’m used to, but that’s not something negative. I’d say it’s very similar to the touch to Drops Fabel, to give you an idea. And it’s already proven to be quite hard-wearing, judging from the impressive number of times the cardigan has been worn since mid-November. Not to sound like a broken record again, but I do love the finished cardigan! It goes with a lot of my dresses, but it seems like it was made to match my purple Emery, doesn’t it?

PS In case you were wondering, the foxy brooch I am wearing in the pictures was made by Mimolette, using a Mollie Makes freebie from a few years ago!

Enregistrer

Enregistrer

Enregistrer

Enregistrer

Enregistrer

Enregistrer

Enregistrer

Enregistrer

Enregistrer

Enregistrer

Enregistrer

Enregistrer

Enregistrer

Enregistrer

Enregistrer

Enregistrer

A Favourite Cosy Outfit

cosy1Ah, Cardamome! Ah, Armande! I intended to blog about them separately because each deserves its own blog post, but I was wearing them both on a day I came home from work when it was still (sort of) daylight, so I jumped on the occasion to take some pictures, and a shared post will have to do.

cosy3The Cardamome dress is yet another Deer&Doe pattern (yes, I do intend on sewing them all ultimately!). It was my favourite one from the A/W 2015 collection and I immediately knew I wanted to make it in this starry cotton lawn I had in my stash. It took me a little bit more than a year to get to it, but I didn’t change my mind in the meantime. I also knew I wanted to highlight the curve of the bib with some piping of the same colour as the stars, which are not white but off-white/ecru. It turns out off-white piping is not that easy to find! I resorted to buying some extremely pale yellow piping and tea-dyeing it. It did not make it a perfect match, but quite close, and the difference is virtually unnoticeable when you look at the finished dress.

cosy4I think I’ve said before that I had recently realised that a lot of my clothes could benefit from either going up one or two sizes at the shoulders or making a wide shoulder adjustment. On this dress I tried simply cutting a size 40 at the shoulders blending to a 36 armhole-bust-waist-hips. I didn’t change the height of the shoulders, only the width, so I kept the 36 sleeves. They fit, so I guess this must have been the right choice. I didn’t bother cutting a larger size at the hips because the skirt seemed wide enough. The skirt is indeed wide enough, but barely. Close call there!

cosy5I didn’t make buttonholes for the buttons (vintage, from a yard sale last August) but used sew-on snaps on the front placket and simply sewed the buttons through all layers at the cuffs, thinking I’d add snaps later if it bothered me not to be able to open these. It has never bothered me.

This dress features my first collar on a stand and my first sleeve placket, and both went swimmingly thanks to the instructions for the sleeve placket and this well-known tutorial for the collar.

cosy10
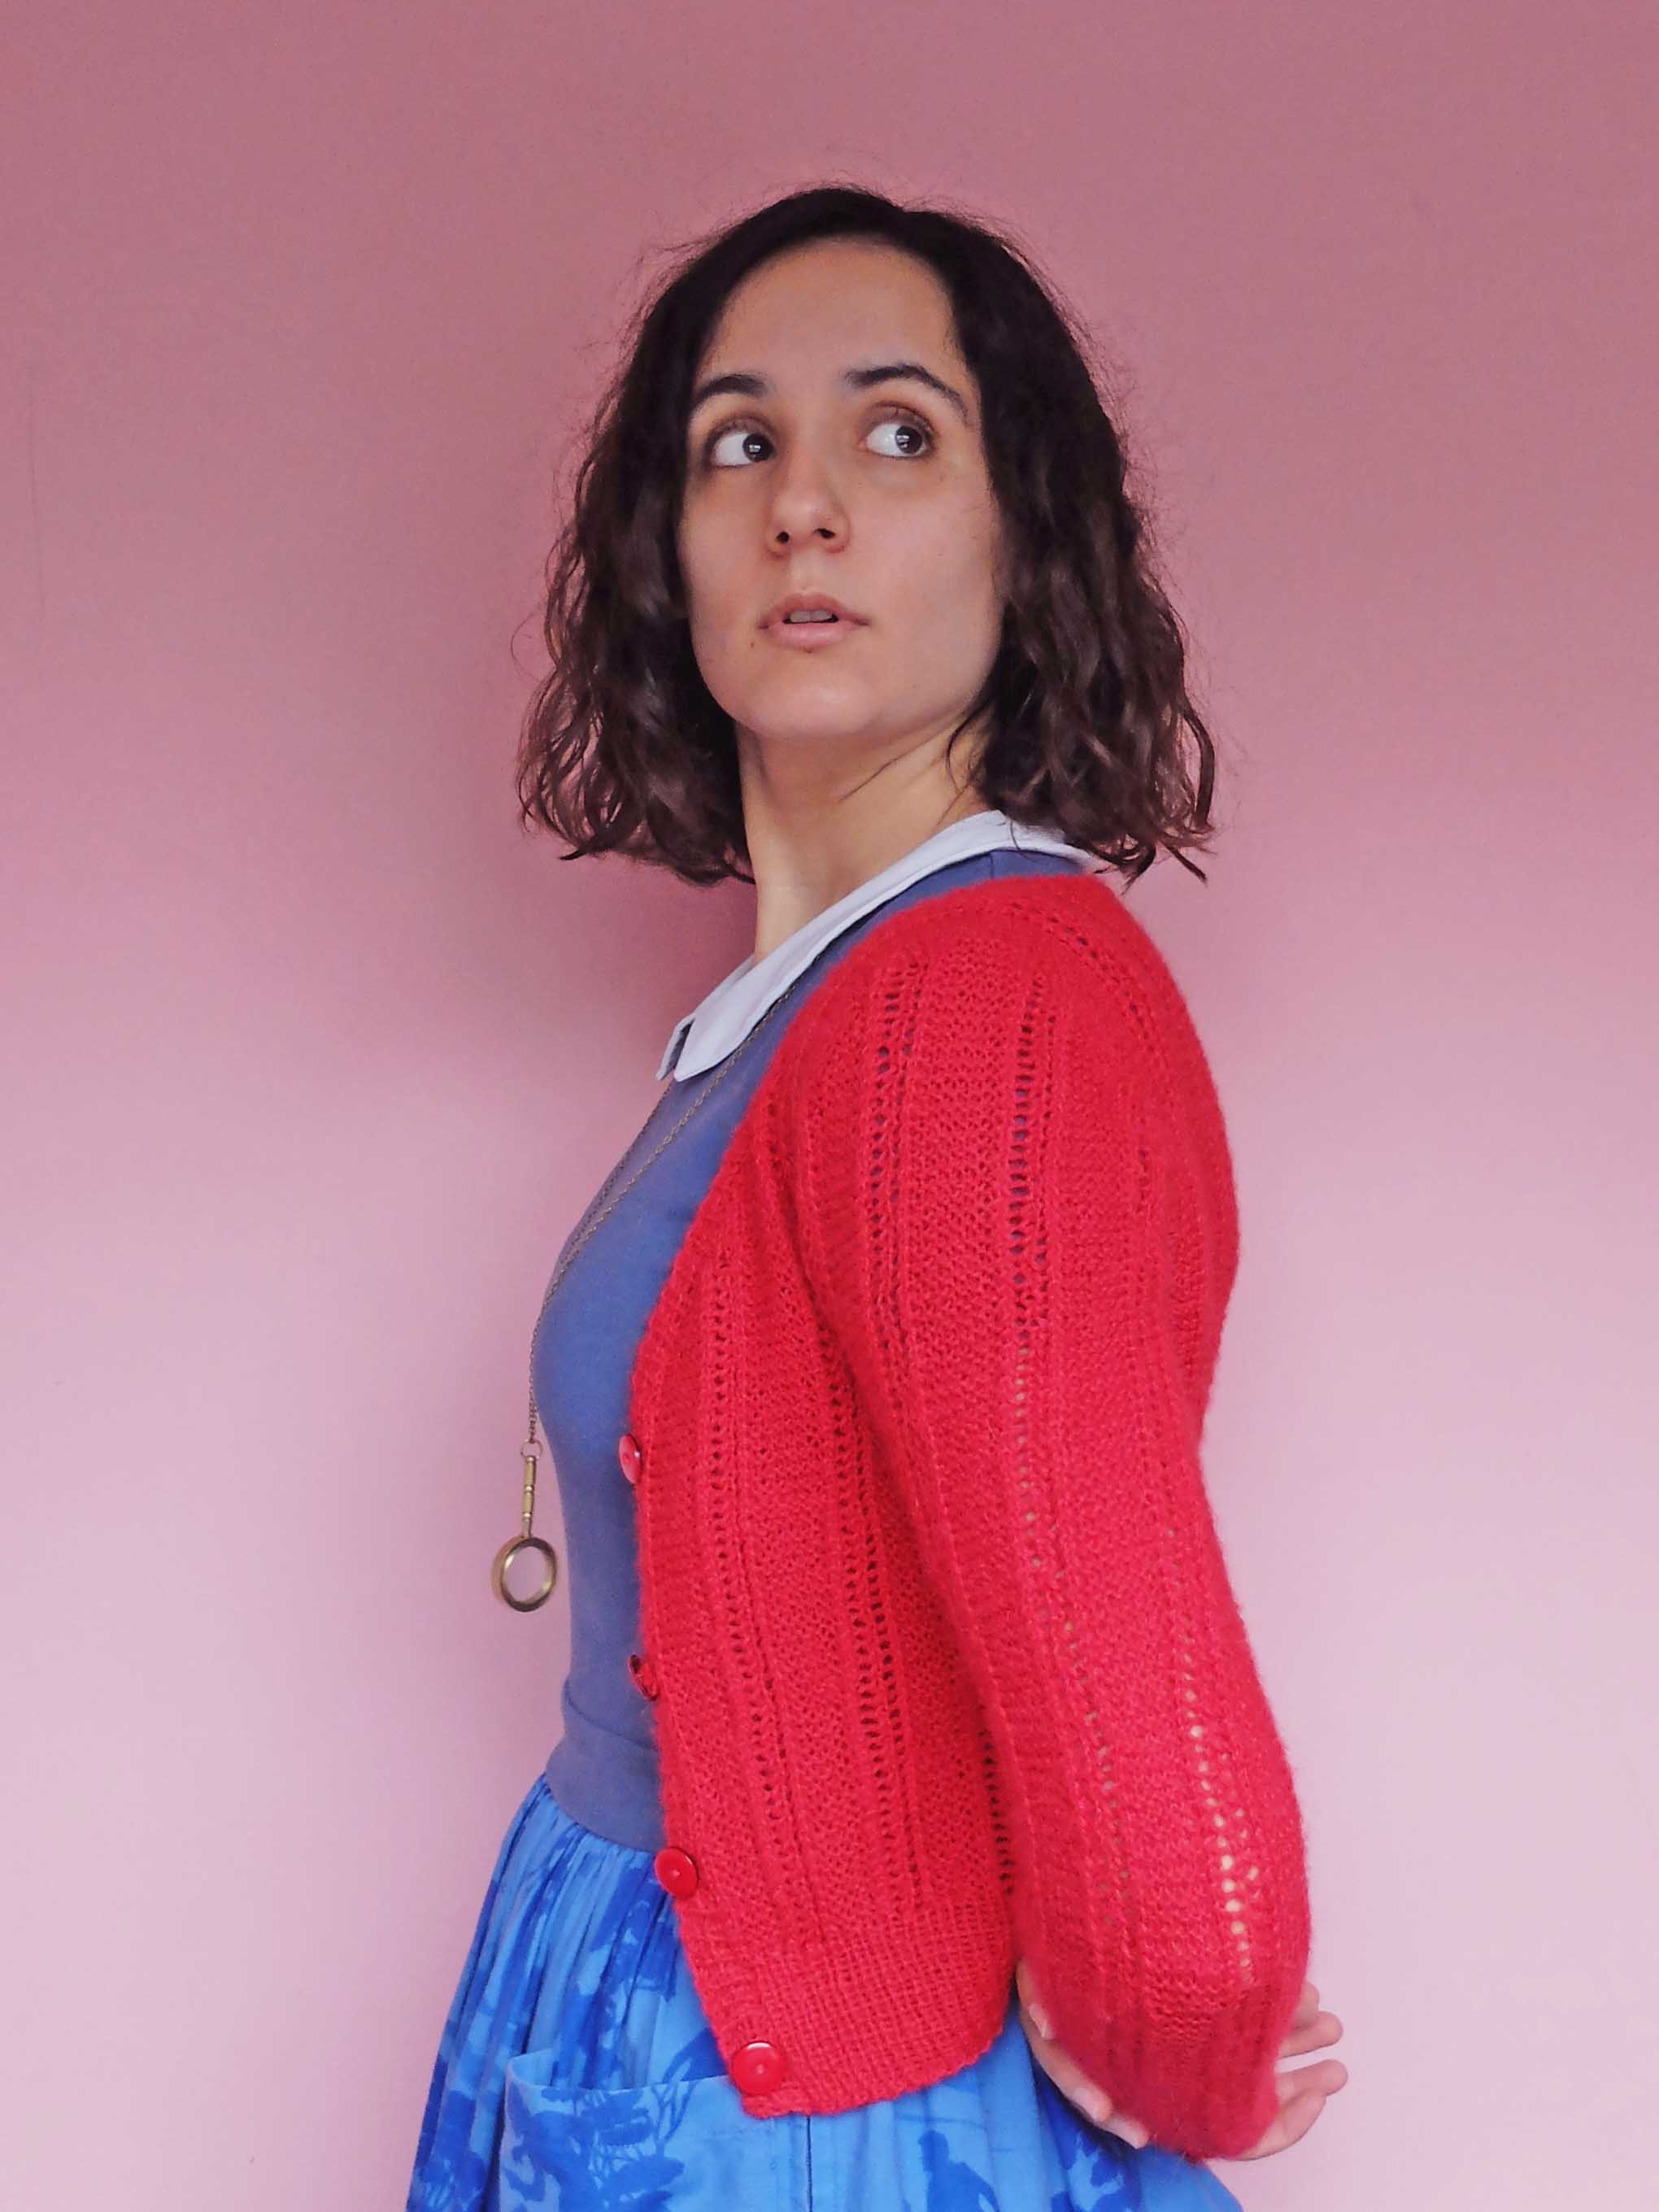
Note that I always wear the collar closed because I am a dork and I love it that way! When I see pictures of about everyone wearing it at least partially open, I do realise that I am kind of alone on this one, but this won’t stop me from wearing it closed all. the. time. In the same vein, why do some people want to get rid of the smocking at the waist? It’s one of the cutest details of the pattern, you guys! Plus, so comfortable!

cosy6Now about the cardigan. It’s Andi Satterlund’s Armande, a free pattern if you can believe it! Once again perfectly thought out (the seamless pocket method alone makes it worth your while!), this pattern was a pretty quick and definitely enjoyable knit. Especially in Drops Nepal, one of my favourite yarns, in this gorgeous blue (denim blue – uni colour 6314).

cosy7When I bought the yarn (more than two years ago according to Ravelry), I had this sweater in mind, but I thought I would make the smallest size as usual with Andi’s patterns, so I only bought 11 skeins. But when I started on the project, I realised that I wouldn’t want as much negative ease for this pattern as for my usual cropped sweaters, so I went up a size. I crossed my fingers and hoped for the best, but 11 skeins were definitely not enough unless I intended to wear my sweater with half a sleeve missing. Lucky for me Saki, who had knit a cardigan with the same yarn, was nice enough to pass on to me her remaining skeins. And double lucky for me, they were from the same dye lot since she had bought them at about the same time in the same shop!

cosy8So after a very short pause I could get back to knitting what was to become one of my favourite cardigans. It goes with much more of my wardrobe than I would have thought, and I simply love its colour, its buttons (from Tissus Passion), its shape, its collar, everything! Like most of my cardigans I very rarely wear it closed, but it does look nice both open and closed.

cosy9I wouldn’t have thought when making this cardigan and this dress that I would like them together so much, but I really do! They’re also the perfect outfit to keep you warm when you’re sick like I am at the moment: the high neckline of the dress protects the chest from drafts and the cardigan is just the right warmth. A thermal cami, two pairs of tights, socks and boots complete what I think is an elegant yet cosy get-up.

cosy2

Enregistrer

Enregistrer

Enregistrer

Enregistrer

Enregistrer

Enregistrer

Seeing Red

marymead5The first time I wore my purple Emery dress, I reached for a red cardigan… and realised I didn’t own any ! How was that possible? I could think of so many outfits that could be topped off with a cropped red cardigan! So the colour of the next knitting project in my queue was easily decided.

marymead2The project in question was Andi Satterlund’s Mary Mead cardigan, which she had published earlier that year. She advised in her blog post about the pattern to use a yarn with silk or alpaca in it in order to get the best result with the garter stitch, and the Alpaca yarn by Drops seemed to be the correct weight (as did the BabyAlpaca Silk yarn, but I preferred the colour of the Alpaca one), so that’s what I ordered. I was kind of baffled at how few skeins I needed: five! And I have most of a skein left, so at €2,65 per skein, that was a pretty inexpensive knit; yay Drops, yay cropped sweaters!

I do have one small reservation about this precise yarn, though: it left red marks on the underarms of two dresses! The stains did come off in the wash without applying any special products, but still, I didn’t find this very pleasant!

marymead3Being used to the construction of Andi’s sweaters and seeing that the stitch of this one was quite simple (columns of garter stitch and of very basic lace), I thought I’d be done in a month, a month and a half tops, ha! It took me close to SIX MONTHS! I kept messing up the garter stitch columns, realising twenty or more rows afterwards that I had knit a few stocking stitches instead… So I unravelled and reknit an incalculable number of times both body and sleeves, and completely lost steam on the way.

marymead4But I did end up finishing the cardigan, and those countless times I had to unravel and reknit were completely worth it as it’s now my most worn cardigan! It goes with so many things in my wardrobe, I can’t believe I waited for so long before even thinking of knitting this one!

marymead1

Enregistrer

Enregistrer

Enregistrer

Enregistrer

Enregistrer

Enregistrer

Enregistrer

Enregistrer

Enregistrer

Agatha Au Naturel

Agatha4This is technically my first completed knit of 2016! I started it last August and finished the knitting part at the very beginning of November… but then I waited for two months and a half to weave in the ends and sew on the buttons, no idea why! When I finally got to it, it was nice spending an hour or two on the finishing touches and getting the impression of having made a whole cardigan in so little time!

Agatha1This Agatha cardigan is my seventh Andi Satterlund sweater/cardigan, and my third time using Drops Nepal yarn (a wool and alpaca blend). What can I say, I’m a creature of habit! I have nothing new to say about the yarn, it’s still very pleasant to work with and to wear, and its only negatives would be that it sheds a little bit of hair on any dark clothes I wear with it, and that it has a strong smell when it’s wet.

Agatha2As for the pattern, it uses the same construction as all of Andi’s sweater patterns, but I would rate it as a little bit more difficult than the other ones I have knit. With the different lace panels of the body that don’t have the same number of rows in their respective repeats, it took me a long time to memorize the repeats and I constantly had to refer to the diagrams, save for at the very end. So nothing complicated per se, but it did require more concentration than the other ones I’ve made, and I am kind of in awe of the people who chose this pattern as their first sweater!

Agatha5There are two little things I’m not in love with on the finished cardigan: the first one is the fact that the upper sleeves are a touch too wide for me, even though I made my usual size (Ravelry notes here). When I look back at the pictures of the pattern, I see that’s how they are supposed to fit, and it’s probably just that I’m used to a closer fit, so nothing serious there.

The other small negative is entirely on my part: I don’t know how I managed that, but I messed up the top buttonhole, which ended up way too close to the edge of the button band! I realised that when sewing on the buttons, so I attached the top button accordingly at first, but then I realised I mostly (more like, always) wear my cardigans open, so it made more sense to sew the button on the same line as the other ones, and have it look crooked when the cardigan is closed (i.e. possibly never) rather than when it is open. Plus, I can also wear it with all buttons closed but the top one like I did in some of the pictures here. Come to think of it, the top buttonhole is on the part I knit last, so if it still bothers me after wearing the cardigan for a little while, I could always reknit it… Though I doubt it will be the case!

Agatha6Speaking of buttons, they are one of the things I like most about this cardigan! For once I found what I wanted in my stash: they are a series of six buttons that my mother had rescued from an old jacket she threw away years (decades?) ago, and I love their vintage style; I think they pair extremely well with the natural colour of the yarn and the style of the cardigan.

Agatha3Another thing I love is the look of the side and sleeve decreases, so neat! And the lace panels, both on the body and on the sleeves. And the cuffs. And… Okay, I think it’s fair to say I quite like this cardigan!

Tangerine Cardigan

Orange6I’ve never been a fan of orange, but ever since I finished this dress I’m wearing in the pictures, I had been wanting to knit an orange cardigan to go with it (hoping it would also go with other things in my wardrobe). Knowing how long it usually takes me to translate my ideas into actions, I’m kind of surprised it took me less than a year to make this cardigan a reality. I finished the dress last year in March, and the cardigan this year in February.

Orange5Once again, it’s a Andi Satterlund pattern, the Marion cardigan, and once again it was a pretty fast (it took me exactly one month from start to finish) and easy knit. Seeing as how much I love both their style and construction, this is certainly not the last of her patterns you’ll see here!

Orange1The yarn is Nepal by Drops (colourway: 2920 orange), which I had already used for this project. It’s a lovely yarn, very nice to knit with, and I always machine wash the finished sweaters (on a very delicate cycle, at 20°C) and they still look like new. So this is certainly not the last time you’ll see this yarn here either.

Orange2I had to shorten the cardigan a little bit for the ribbing to sit at my waist (judging from the pictures I think maybe I should have shortened it even more) and I chose to lengthen the sleeves to full length, because it was very cold when I knit it and I couldn’t imagine myself not wanting to wear long sleeves at the time. They seemed long enough at first, but I realised when wearing the cardigan that after I raise my arms they tend to creep up a tad and I sometimes have to readjust them. You can see that on my right arm in some of the pictures, because I had just reached for the shutter button of the camera. And while you’re at it, why don’t you take a look at the cute little cables on the sleeve ribbing? I think they are my favourite detail on this pattern!

Orange3Just like with the skirt I showed you last week, I finished this cardigan so long ago that I do not remember all of the details, so it’s a lucky thing I wrote everything down on Ravelry at the time. But just like with the skirt I showed you last week, I finished this cardigan so long ago that I’ve already had plenty of occasions to wear it and I know that it goes great with a lot of things in my wardrobe!

Orange4

The Black Zinnia

BlackZinnia5I’m not one to read those magazine articles that assume that every woman needs certain items of clothing in her wardrobe, such as a little black dress and other nonsense (I’m not one to read any of those magazines, period. Not anymore. You wouldn’t believe how much my self-esteem has improved since I’ve restricted my magazine buying to Burda and other craft related periodicals). It’s kind of ironic that I’m saying that when my last blog post featured what could obviously be described as a [shudder] LBD, but seriously, I lived without a LBD for most of my life and I didn’t feel the need for one like, ever!

BlackZinnia1Anyway, rant over I guess. What I wanted to tell you was that a black cardigan was one of the rare garments I felt I needed. I used to own a store-bought one that you can see here (I don’t know why I’m bothering linking to that picture: everybody knows what a black cardigan looks like, don’t they?), but it died and I’d been missing it sorely ever since.

BlackZinnia3There were a few pieces in my wardrobe, such as the dress you see in the picture I absurdly linked to a few rows above, that I always wanted to wear with a black cardigan. But it’s also so much more appealing to knit colourful yarn that boring black yarn, isn’t it? So each time I started a new knitting project, it didn’t even cross my mind that I could make that black cardigan.

BlackZinnia4

Smiling is for the weak.

Enter Zinnia. I don’t know why, but when I was perusing my favourite yarn shop (no link because it recently closed doors and I’ll be sad about it forever 😦 ) to choose some yarn for that project, for once I was drawn to grey and black. The various greys that were available in the shop didn’t really appeal to me, so I chose black.

BlackZinnia6And I am so happy I did! Not only was the black yarn not boring at all to knit (annoying maybe; it was a cat hair magnet! – not so much since I completed it, weirdly!), but I finished this knit two weeks ago and I’ve already worn it so often: it seems like a black cardigan does go with everything. I also like the way the textured stitch looks in black. I was afraid the dark colour would hide it, but it doesn’t and I think it looks great. The yarn is Drops Karisma, a superwash yarn which I’ll definitely use again in the future.

BlackZinnia7I really enjoyed knitting this pattern: the textured stitch kept things interesting yet it was very straightforward to follow. The lace diamonds, too, were a pleasure to knit: I placed markers between each repeat, which I always do when I’m knitting lace, and it made things easy as pie. You can find my Ravelry notes here.

BlackZinnia8When in-between sizes as is often the case with Andi’s patterns, I usually choose knitting a size smaller, which is best with all those close-fitting cropped sweaters I love knitting/wearing, but for this one I preferred going a size bigger since it was supposed to be looser-fitting. And I’m glad with the result: I can comfortably layer one or two long-sleeved tees under it, yet it doesn’t look too loose-fitting either when I’m only wearing one layer of short or 3/4 sleeves.

BlackZinnia9I should be back in not too long with another knit, and then with that skirt I started two months ago. Both are finished and just need to be photographed, alas we all know “just” photographing our sewing projects is even less of a small feat in winter than during the rest of the year!BlackZinnia2

Navy Hetty

NavyHetty1It was HOT when I took these pictures, not the ideal weather to be wearing a 3/4 sleeve dress and a wool cardigan! But I was so happy for this cardigan to finally be over that I couldn’t wait for the weather to get colder before I took the pictures.

NavyHetty2I started knitting this cardigan at the very beginning of June, thinking I would be finished in no time. I thought I would knit it in about two weeks, ha! But when I reached the end of the body, I realised my gauge was tighter than I thought and I was probably going to end up with a too small cardigan seeing how tiny the body looked.

I was determined to start from scratch, but not very motivated to do so, so I let it rest for a few days. Then I read on lladybird’s blog that it was probably supposed to look that tiny before blocking, so I changed my mind and chose to go on with the same gauge/size after all.

NavyHetty3Still, I couldn’t shake the fear that I was in fact knitting a kiddie size cardigan (Mimolette laughing her ass off every time she saw how tiny it was didn’t help that fear either! 😉 ), so I lost part of my motivation. That and a very busy month of June meant that there were a lot of days where I didn’t even touch my knitting needles. Oh, and I had to start the first sleeve all over again because I had made a stupid mistake in the way I knit my yarn overs in the round.

NavyHetty4But the Hetty is such a fast knit that, even by knitting one row here, one row there, it was not that long before a whole cardigan fell off my needles.

I added two repeats of the pattern at the end of the sleeves and four rows to each button band to compensate for my gauge being so different from the pattern, but I didn’t add any length to the body because I usually need to shorten my other sweaters/cardigans.

I also picked up way more stitches than recommended (85 instead of 61!) for the button bands, thinking that way it would be easier to stretch them when blocking the cardigan. This meant adding some buttonholes, too: I made eleven instead of eight. Same with the neckband, I picked up 98 stitches instead of 78.

NavYHettyDétailI should have taken a picture of the cardigan before I blocked it (I finished it at night and I didn’t have the patience to wait for the morning light to block it) but believe me when I say it was kid sized: pre-blocking, I think it would have fit a four-year-old!

I can’t tell you how relieved I was when I tried it post-blocking and saw that it fit! It’s very short, but it hits me exactly where I wanted it to, right at the waist! The sleeves too are the perfect length. The whole sweater could stand to be a bit wider though; it is very tight. But luckily it is not so tight that it’s uncomfortable, and as you can see I can wear it over a dress with sleeves.

NavyHetty5You may remember this was the first part of my OAL participation. I’m thinking about changing my plans for the matching dress: I still want to use the same fabric, but I’m having second thoughts regarding the pattern. With the hot weather in Brussels right now and the fact that I’m going to Spain in August, I was thinking about replacing my chosen pattern with the Colette Parfait dress. Right now I have more use of a sundress with straps, so unless I don’t have enough fabric for the Parfait, I think I’ve made up my mind!